Friday, March 29, 2013

Golden Easter Eggs

Thank you for visiting. I now have a new home at www.countrypeony.com. I hope you will find me there.

I wanted to do something a little different for this year's Easter egg decorations. When I came across She Knows' post on how to create a marbelized golden egg, I knew I had to try it! These eggs will certainly stand out from the rest, so I would suggest not hiding them ;).

Easter Egg

She Knows made these eggs easy to do with their thorough explanation.

I emptied my eggs by using a sharp knife to cut a small hole on each side. Then I took a wooden skewer with the pressure of water to empty the egg. I let them sit over night before I attempted the dying and gold leaf process.

I would also suggest rolling the egg onto the gold leaf, instead of picking the gold leaf up.

Dying Eggs

Easter Eggs

I placed my eggs in an apothecary jar, and...

in a miniature dish
in miniature dishes.

I hope you and your family have a wonderful Easter!

Wednesday, March 27, 2013

Inspiration Cabinet

Thank you for visiting. I now have a new home at www.countrypeony.com. I hope you will find me there.

I believe that we all need a place to go to for inspiration to collect our ideas, write down our dreams, and showcase cherished treasures. I have found that place in our new home with an old cabinet that I refinished from my parent’s farm.

Inspiration Cabinet

The cabinet came from the playhouse that my father built myself and my four siblings. As a child I remember retreating to the playhouse so that I could add treasures to the cabinet. Now, the cabinet has a new face and new purpose in my craft room. It holds memorable notes and treasures that inspire me. It also contains supplies for the silk flower bouquets that I make. I love the idea of using an inspiration cabinet versus an inspiration board, because the cabinet can be closed and kept secret.
Inspiration Cabinet

To make it my own, I added the crackle finish, and attached some leftover tin to the face. To this day the cabinet brings me back to my childhood and the grand dreams I had, and still have.
Crackle Paint

Inspiration Cabinet

Do you have a secret hiding spot, or a place that you retreat to for inspiration?

Thursday, March 21, 2013

Colander Planter


Thank you for visiting. I now have a new home at www.countrypeony.com. I hope you will find me there.

Happy spring! I absolutely love this time of the year. Everything is so vibrant, fresh, and beautiful.
Before the weather gets too hot, my husband and I are taking advantage of this time by grilling and eating outdoors. However, I noticed that our outdoor table is missing something, and that would be color. The March 2013 Real Simple’s magazine article, “New Uses for a Colander,” had a glorious resolution for me: to turn a colander into a planter.
Real Simple
I knew my plan would come to fruition, when I saw that World Market recently added vibrant colors to their stainless steel display. I used the tropical plant that my husband and I bought on our honeymoon in Hawaii. I also added some lovely purple mums for even more color. And voilĂ ! A colander planter was born.

Colander Planter


For this simple DIY project, you will need: a colander (preferably stainless steel), coffee filters, potting soil, fertilizer (optional).
First, you place the coffee filters strategically around the inside of the colander. Then you add the soil and fertilizer. From here you will plant your flowers/plants of choice, and cover with more soil to hide the coffee filters. Lastly, you need to water your plants in place.
coffee filter
Fertilizer

You can also choose to hang the colander by its handles with wire or chains to create a hanging plant option.

succulent garden
The colander planter has made a nice home next to our succulent garden
How are you enjoying what spring has to offer?

Monday, March 18, 2013

Homemade Crepes

Thank you for visiting. I now have a new home at www.countrypeony.com. I hope you will find me there.

Homemade Crepes
I have always loved the delicacy of crepes, and the sweet and savory memories they conjure up from my childhood. Come to find out, my husband is a huge fan as well. I realized how easy they were to make at home when we received a crepe maker as a wedding gift. The great thing about crepes is that they can be as versatile as you are. You can make them savory or sweet, and you can make them ahead for those busy nights.

I adapted the following recipe from the CucinoPro electric griddle and crepe maker recipe book. I used a crepe maker, but you can use any type of large griddle that you have on hand.
For the basic crepe batter you will need: 4 large eggs, 1 ½ cups of milk, 1 ½ cups of all-purpose flour, ¼ teaspoon of salt, and 2-3 tablespoons of butter.

You will combine the eggs and milk, and whisk them together. Then, in a separate bowl you will combine the flour and salt, and whisk them together. From here you will make a well in the center of your flour mixture and slowly pour the eggs/milk mixture into the bowl. As you are pouring whisk the sides of the flour mixture into the eggs/milk mixture. You want to pour slowly, so that you ensure full mixture of all ingredients without any clumps.
Crepe Mixture

Once you have mixed both bowls together, continue to whisk until your mixture forms a smooth batter. You can now let your batter sit at room temperature for 30 minutes.   

Crepe Batter

In a microwave-safe dish you will melt the butter. Then take a pastry brush and spread the melted butter onto your hot crepe maker or griddle.
Pastry Brush
Then pour the batter onto the crepe maker or griddle, and use a flat utensil (the crepe maker comes with a wooden utensil ideal for spreading the batter) to lightly spread the batter out. Don’t apply too much pressure to the batter, because you may break it.
Crepe Maker
After the bottom side of the crepe reaches a golden color, you can flip the crepe over until it too reaches the desired golden color. When both sides are done, you can add the berry filling. Once you add the berry filling you can either roll the crepe or fold it into quarters.  

Crepes

Blackberry Sauce

Folding Crepes

*If you are making the crepes for later use cool the completed crepes on racks. Then stack the crepes in between sheets of waxed paper and place in a freezer tight bag. Then place in the freezer for later use.

For the berry sauce, you will need: 3 cups of fresh blackberries (you can use whatever berry you so desire), ½ cup sugar, ¼ cup of water (I used a little less water, because I added the lime ice cubes I froze a couple of months ago, 1 tablespoon of cornstarch, pinch of salt, and a teaspoon of butter. (I never said that this recipe was healthy J)

First you will wash the blackberries, and ensure that you extracted all of the leaves. You will set one cup aside, and crush it in a blender or by hand. Slice the remainder two cups of berries and then set them aside.

Combine the crushed berries, sugar, water, lime cubes, cornstarch, and salt. Cook over medium heat, stirring constantly, until mixture thickens and boils. Once the mixture starts to boil continue to stir it for one minute. (It should reach a beautiful deep-red color.) Then add the butter and fold in the sliced berries.
Blackberries
Blackberry Sauce
For the finishing touches, I added some uncooked berries, and a couple of mint leaves from my garden. I hope you enjoy!

Crepes

Wednesday, March 13, 2013

Bargain Buy of the Week: Copper Tea Pot

Thank you for visiting. I now have a new home at www.countrypeony.com. I hope you will find me there.

I think copper is one of the most beautiful metals. I love its color, durability, and the character that it shows with age. So I was extremely thrilled when I found a copper teapot at our local Goodwill outlet store. And I was even more excited when the salesman behind the register said that it was only $2.00. I did nothing to this piece because I liked its natural age marks and the stories it told.

Goodwill

Copper Teapot

I knew it would be a great addition to the bookcase that I recently personalized with some paint and fabric.
copper 

Are you a bargain buyer? What has been your best bargain purchase?

Monday, March 11, 2013

How to Crackle Paint

Thank you for visiting. I now have a new home at www.countrypeony.com. I hope you will find me there.

Paint Crackle Effect
I always loved the sights, smells, and tastes from my mother’s herb garden as I grew up. My husband and I have a small backyard, but I thought I could have a small area designated as a start-up herb garden inspired by my mother’s. So my father came to visit to spread some of his gardening knowledge, and helped me start my herb garden. After everything was planted, I knew I had to add some character to the garden. 

So, my husband and father helped me build some signs. We used a jig saw to cut scrap ply wood and stakes. We then secured the signs with pin nails.

I knew I wanted to add a distressed look to the signs. I thought the crackle effect would be perfect, and it would wear really well outside.

To get the crackle effect I used: base color (Sherwin-Williams exterior impatiens petal), Behr Premium Plus Crackle paint, flat paint (Rust-oleum Painter’s Touch exterior white flat paint), and a paintbrush.
The process to achieve the crackle look is very simple. You paint the base coat and wait until it is dry. Then you paint the Crackle coat and wait until it is dry (it will take about an hour to dry). Finally, you paint the top coat and watch as it transforms over the period of half an hour. I told you the process was extremely simple. J
Crackle effect 

From here I used Sharpie gold and silver oil-based paint markers to add the names to the signs.
Basil

Basil

Rosemary

Tomato
I know that this is not an herb. But I love tomatoes, and they grow so well in Texas.

Garden Sign
And how could we not plant an orange pepper?

Have you ever applied the crackle effect?


Update: April 21, 2013

Warning: If  your dog is trained to retrieve, you may not want to place the signs around him/her. If your dog does fill the need to retrieve the signs, you may need to start back at step one, and find a better placement for your signs :).

Today, I walked out to find my signs retrieved and damaged next to the door. Then, I found Nessie feeling very guilty :).

damaged crackled signs


Friday, March 8, 2013

DIY Tassel Garland

Thank you for visiting. I now have a new home at www.countrypeony.com. I hope you will find me there.

DIY Tassel Garland


This simple tissue paper project brought me back to my childhood. I wanted to add a whimsical touch to my craft room, and I thought tissue paper tassel garland would do the trick. Below is the picture that inspired me to create the garland.


Ruffled Blog
Via
You will need: Tissue paper, jute twine, hot glue gun with glue sticks, scissor, and tape.


First off, take the tissue paper and use the natural creases to fold five pieces together (making 10 pieces of tissue paper for the tassel). From here you can start on the folded end, and draw a line three inches from the top. This line will be your guide for how far up you want your scissor to go when you are cutting the paper.

Tissue Paper


From here, you will start to cut up toward the line. My pieces are about 1 inch wide. You can choose to make your piece sizes thinner or wider. It doesn’t have to be exact. Have fun with it.
Tissue Paper
Once you are done cutting all of your lines, you will start to roll the top (uncut part) inward. (Fold on the side that you drew the line, so the line doesn’t show on your finished product).

Pink Tissue Paper

While you were rolling your piece together you may have noticed that the tassel strands became tangled. Just run your fingers through the strands to untangle. From here you can secure your tassel in place with some tape.

Now you can add the finishing piece by placing the twine on it. Start off by adding a small dollop of hot glue to the bottom of the top. Place the end of the twine to the glue. Hold the twine in place until the glue dries.
Pink Tissue Paper
Then slowly work your way up the top of the piece adding hot glue as you go.
Twine
Before you reach the top, take your twine and make a loop over the top (so you can have a place to hang the tassel). Then add the glue on the other side so you can secure it in place.
Tissue Paper Garland
Now take the rest of the twine and wind it around until you reach the top. Then cut off the excess twine and secure the end with glue.
Twine
You can hang the tassels with the jute twine to create the tassel garland.
Tassel Garland

I hope you have as much fun making it as I did!

Tuesday, March 5, 2013

Kale Chips

Thank you for visiting. I now have a new home at www.countrypeony.com. I hope you will find me there. 

With a busy schedule, unfortunately, convenience sometimes outranks healthy as a factor in my food choices. So when I come across foods that are convenient, tasty, and healthy; I leap for joy. This kale recipe does not disappoint.
baked kale recipe
For this baked kale recipe you will need: a handful of kale, salt, pepper, olive oil, salad spinner (optional), knife, cutting board, mixing bowl, aluminum foil, and a baking sheet.
Preheat the oven to 350 degrees.

You start off by cleaning the kale with water (kale leaves have great hiding spaces for dirt). From here, you need to ensure your kale is as dry as you can get it. I recommend using a salad spinner to get all of the extra water off (kale leaves also have great hiding spaces for water). If you don’t have a salad spinner you can dry the kale leaves with a paper towel.
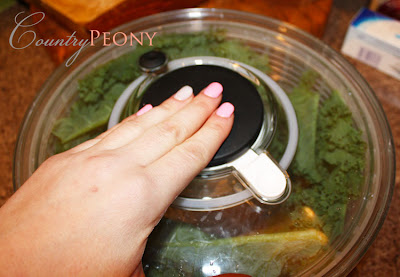
salad spinner
Salad Spinner
From here, I like to cut off the excess vein from the bottom, and then I devein the leaves. From here you will cut the kale into smaller, bite-size pieces.
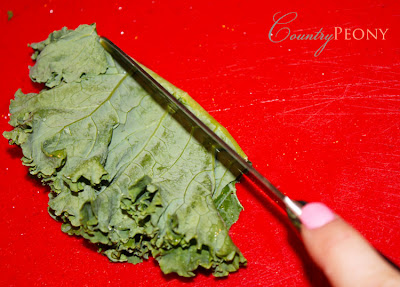
Deveining Kale
Deveining Kale
Now you will take the kale and place it in your mixing bowl. Add about 2 tablespoons of olive oil, 1 teaspoon of salt, and 1 teaspoon of pepper. It is best to use your hands as you mix the kale, oil, salt, and pepper. You can always add more ingredients to taste. You can also get adventurous and add an herb like rosemary, or a hot factor like red pepper flakes.

prepared kale

Once you have your set combination of ingredients all mixed together, line a baking sheet with aluminum foil (for easy clean up). Take your kale mixture and spread it across the lined baking sheet. Make sure that you have a single layer of kale on the sheet (you can always use more baking sheets if you need to). The single layer ensures a crispy chip.
Baked Kale

 Place the kale in the 350 degree oven for about 10 minutes. When the kale is ready the edges will be a darker green, and the texture will be crispy. You can always add a couple of more minutes to the timer if you want extra crispy chips (but make sure that you don’t burn your kale).

And voilĂ ! You have a very healthy and easy option to snacking. Enjoy!
Kale Recipe
Krispy Kale Chips


Related Posts Plugin for WordPress, Blogger...